VSCode Setup and Usage
Installation
VSCodium is an open-source build of the same source code. Download it here: https://github.com/VSCodium/vscodium/releases
Linux Installation:
sudo dpkg -i Downloads/vscodium*.deb
Windows Installation Options:
- Accept the default installation path
- keep "Register Code as an editor for supported file types" checked
- keep "Add to PATH" checked
- other options: set to your preference
VSCode: Download from here
Ubuntu-specific
cd ~/Downloads
sudo dpkg -i code_1.7* #.... tab complete
sudo apt install -yf
Useful command-line arguments
Note: this only works if you added vscode to your system
PATH
Usage: code [options][paths...]
Example:
code -n ~/websites/danb0b.github.io/
will open a new folder with that path loaded in the explorer window
  -a --add <folder>      Add folder(s) to the last active window.
  -n --new-window        Force to open a new window.
  -r --reuse-window      Force to open a file or folder in an already opened window.
  --extensions-dir <dir> Set the root path for extensions.
  --list-extensions      List the installed extensions.
  --show-versions        Show versions of installed extensions, when using --list-extensions.
  --install-extension <ext-id | path> Installs or updates an extension.
  --uninstall-extension <ext-id>      Uninstalls an extension.
  --enable-proposed-api <ext-id>      Enables proposed API features for
  --disable-extensions            Disable all installed extensions.
  --disable-extension <ext-id>    Disable an extension.
  --sync <on | off>               Turn sync on or off.
Shortcuts
| Key Combination | Description |
|---|---|
| ctrl+shift+p | opens the command window |
| ctrl+shift+e | opens explorer |
| ctrl+shift+x | opens extensions |
| ctrl+shift+g | opens git |
| ctrl+shift+f | opens search |
| ctrl+shift+k | remove line |
| ctrl+shift+/ | comment line: |
| ctrl+up | move line up |
| ctrl+down | move line down |
| ctrl+k,v | preview |
| ctrl+shift+i | format document |
| ctrl+i | italicize selection |
| ctrl+b | bold selection |
| alt+z | switch text wrap mode |
Extensions
from here
open a terminal window and paste the following in:
alefragnani.project-manager
bierner.markdown-yaml-preamble
brunnerh.insert-unicode
curlconverter.curlconverter
davidanson.vscode-markdownlint
docker.docker
donjayamanne.githistory
dotjoshjohnson.xml
james-yu.latex-workshop
jscearcy.rust-doc-viewer
mathematic.vscode-latex
mhutchie.git-graph
ms-azuretools.vscode-containers
ms-azuretools.vscode-docker
ms-python.debugpy
ms-python.python
ms-python.vscode-pylance
ms-python.vscode-python-envs
ms-toolsai.jupyter
ms-toolsai.jupyter-keymap
ms-toolsai.jupyter-renderers
ms-toolsai.vscode-jupyter-cell-tags
ms-toolsai.vscode-jupyter-slideshow
ms-vscode-remote.remote-containers
ms-vscode.hexeditor
pkief.markdown-checkbox
pycom.pymakr-preview
redhat.vscode-xml
redhat.vscode-yaml
rust-lang.rust-analyzer
shd101wyy.markdown-preview-enhanced
streetsidesoftware.code-spell-checker
takumii.markdowntable
yzane.markdown-pdf
yzhang.markdown-all-in-one
to install locally you can use:
cat << EOF | xargs -I {} codium --install-extension {}
<...the list above>
EOF
to copy another computer's list of extensions:
ssh <othercomputername> codium --list-extensions | xargs -I {} codium --install-extension {}
for example:
ssh zenbook codium --list-extensions | xargs -I {} codium --install-extension {}^C
code --install-extension alefragnani.project-manager
code --install-extension bierner.markdown-yaml-preamble
code --install-extension curlconverter.curlconverter
code --install-extension davidanson.vscode-markdownlint
code --install-extension docker.docker
code --install-extension dotjoshjohnson.xml
code --install-extension james-yu.latex-workshop
code --install-extension mathematic.vscode-latex
code --install-extension mhutchie.git-graph
code --install-extension ms-azuretools.vscode-docker
code --install-extension ms-python.debugpy
code --install-extension ms-python.python
code --install-extension ms-python.vscode-pylance
code --install-extension ms-toolsai.jupyter
code --install-extension ms-toolsai.jupyter-keymap
code --install-extension ms-toolsai.jupyter-renderers
code --install-extension ms-toolsai.vscode-jupyter-cell-tags
code --install-extension ms-vscode-remote.remote-containers
code --install-extension pkief.markdown-checkbox
code --install-extension pycom.pymakr-preview
code --install-extension redhat.vscode-xml
code --install-extension redhat.vscode-yaml
code --install-extension shd101wyy.markdown-preview-enhanced
code --install-extension streetsidesoftware.code-spell-checker
code --install-extension takumii.markdowntable
code --install-extension yzane.markdown-pdf
code --install-extension yzhang.markdown-all-in-one
I don't use these extensions any more:
#code --install-extension waderyan.gitblame
#code --install-extension tamasfe.even-better-toml
#code --install-extension donjayamanne.githistory
#code --install-extension codezombiech.gitignore
#code --install-extension ms-toolsai.vscode-jupyter-slideshow
#code --install-extension ziyasal.vscode-open-in-github

code --disable-extension waderyan.gitblame
code --disable-extension tamasfe.even-better-toml
code --disable-extension donjayamanne.githistory
code --disable-extension codezombiech.gitignore
code --disable-extension ms-toolsai.vscode-jupyter-slideshow
code --disable-extension ziyasal.vscode-open-in-github
code --list-extensions
Using VS Codium
Note: If you are installing VSCodium, you need to use the command
codiuminstead ofcode
Change the codium repositories to vscode in order to find all the extensions
sudo nano /usr/share/codium/resources/app/product.json
Replace:
"serviceUrl": "https://open-vsx.org/vscode/gallery",
"itemUrl": "https://open-vsx.org/vscode/item",
with
"serviceUrl": "https://marketplace.visualstudio.com/_apis/public/gallery",
"itemUrl": "https://marketplace.visualstudio.com/items",
Bash script for that:
sudo sed -i 's|"serviceUrl": "https://open-vsx.org/vscode/gallery",|"serviceUrl": "https://marketplace.visualstudio.com/_apis/public/gallery",|g' /usr/share/codium/resources/app/product.json
sudo sed -i 's|"itemUrl": "https://open-vsx.org/vscode/item",|"itemUrl": "https://marketplace.visualstudio.com/items",|g' /usr/share/codium/resources/app/product.json
Finally install extensions
codium --install-extension alefragnani.project-manager
codium --install-extension bierner.markdown-yaml-preamble
codium --install-extension brunnerh.insert-unicode
codium --install-extension curlconverter.curlconverter
codium --install-extension davidanson.vscode-markdownlint
codium --install-extension docker.docker
codium --install-extension donjayamanne.githistory
codium --install-extension dotjoshjohnson.xml
codium --install-extension james-yu.latex-workshop
codium --install-extension jscearcy.rust-doc-viewer
codium --install-extension mathematic.vscode-latex
codium --install-extension mhutchie.git-graph
codium --install-extension ms-azuretools.vscode-containers
codium --install-extension ms-azuretools.vscode-docker
codium --install-extension ms-python.debugpy
codium --install-extension ms-python.python
codium --install-extension ms-python.vscode-pylance
codium --install-extension ms-python.vscode-python-envs
codium --install-extension ms-toolsai.jupyter
codium --install-extension ms-toolsai.jupyter-keymap
codium --install-extension ms-toolsai.jupyter-renderers
codium --install-extension ms-toolsai.vscode-jupyter-cell-tags
codium --install-extension ms-toolsai.vscode-jupyter-slideshow
codium --install-extension ms-vscode-remote.remote-containers
codium --install-extension ms-vscode.hexeditor
codium --install-extension pkief.markdown-checkbox
codium --install-extension pycom.pymakr-preview
codium --install-extension redhat.vscode-xml
codium --install-extension redhat.vscode-yaml
codium --install-extension rust-lang.rust-analyzer
codium --install-extension shd101wyy.markdown-preview-enhanced
codium --install-extension streetsidesoftware.code-spell-checker
codium --install-extension takumii.markdowntable
codium --install-extension yzane.markdown-pdf
codium --install-extension yzhang.markdown-all-in-one
codium --install-extension donjayamanne.githistory
Markdown all-in-one
go to settings @id:editor.defaultFormatter @lang:markdown formatter ctrl_+ shift + I then formats your document
Python
When working with multiple python environments, you should make sure to use the correct one for the task you are doing. To do this, you will need to select from a list of python interpreters. Type ctrl+shift+p then type / select "python select interpreter" from the list.
- https://code.visualstudio.com/docs/python/python-tutorial
- https://www.pythontutorial.net/getting-started/setup-visual-studio-code-for-python/
- https://theproductiveengineer.net/how-to-set-up-vs-code-for-python/
Debugging Python Code
see this reference to add a debug configuration
pymaker
-
install pymakr preview
code --install-extension Pycom.pymakr-preview
Getting Started with Pymakr (from here)
- In File explorer(
ctrl+shift+e)- add or create a project folder for holding your micropython code (suggestion: name it "micropython"). Consider creating one in your "code" git repository.
-
navigate to "Pymakr: Projects" tab in the workspace explorer window on the left
-
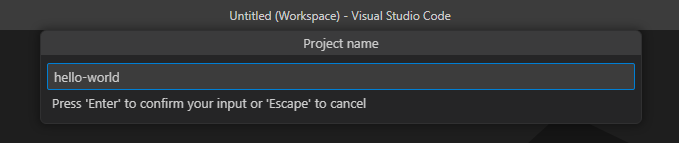
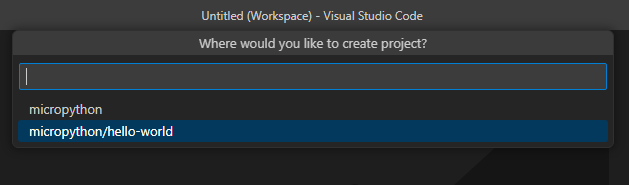
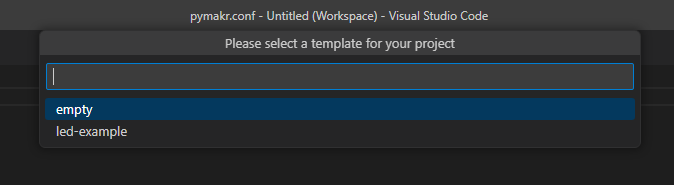
select "create project". Select the same code folder as above and specify a project name (like "hello-world"). Select the option to create a subdirectory with the micropython folder.
-
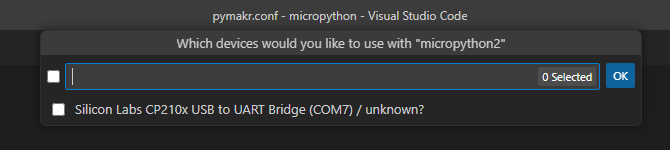
Connect your device via usb to your computer
-
Within the "hello-world" project that is created within the "Pymakr: Projects" tab, add a new device. Follow the prompts to select the appropriate com port
-
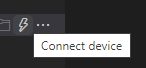
Connect to the device by selecting the lightning bolt icon
-
Open up a terminal window by selecting the box with an arrow in it

-
A terminal window should open and look like this:

MicroPython v1.19.1 on 2022-06-18; ESP32 module with ESP32 Type "help()" for more information. >>> -
At the command prompt, type in
print('hello world')which should return
hello world -
If you wish to disconnect, you can use:

-
Working with Micropython
Micropython can either run code from the interpreter (the "terminal" as VSCode puts it), or by loading a file from its onboard storage. When the ESP32 is reset (using the EN button), it looks for two files, in a specific order:
- boot.py
- main.py
if there are any loops in these files that prevent execution from ending, you must type ctrl+c to terminate execution from the interpreter window. This will stop any python files from running and bring control back to the interpreter
You must always stop execution on the ESP32 before trying to upload files to it.
Saving files to/from the ESP32
Within the "Pymakr: Projects" workspace there are several other buttons that you can use to sync files to the esp32
- Upload project to device: Uploads all your project files to the device
- Download project from device: Pulls files off the device
- Open in Explorer: This opens up the ESP32 as a virtual file system in the file explorer and allows you to investigate and work with the file system directly.
From the file explorer window, you can also right click and select "pymakr-->upload to device" to upload individual files
External Resources
- VSCode
- Pymakr & ESP32
- https://github.com/pycom/pymakr-vsc/blob/HEAD/GET_STARTED.md
- https://marketplace.visualstudio.com/items?itemName=pycom.Pymakr
- https://randomnerdtutorials.com/micropython-esp32-esp8266-vs-code-pymakr/
- https://lemariva.com/blog/2018/12/micropython-visual-studio-code-as-ide
- https://docs.espressif.com/projects/esp-idf/en/stable/esp32/get-started/vscode-setup.html
- https://stackoverflow.com/questions/67647095/how-to-setup-windows-10-vscode-pymakr-for-python-programming-micropython
Keybindings
these are typically located in ~/.config/Code/User/keybindings.json
recent settings here
User Settings
located in ~/.config/Code/User/settings.json
recent settings here
All-in-one config
you can modify to suit...
mypath="$(echo $HOME)/.config/Code/User/"
cp "$(echo $mypath)settings.json" "$(echo $mypath)settings.json.bak"
cp "$(echo $mypath)keybindings.json" "$(echo $mypath)keybindings.json.bak"
curl https://files.danaukes.com/notebook/vscode-setup/settings.json -o "$(echo $mypath)settings.json"
curl https://files.danaukes.com/notebook/vscode-setup/keybindings.json -o "$(echo $mypath)keybindings.json"